Discover our
resources


Materials required:
- 1 robot minimum
- 1 computer/robot
- Flat, light-colored surface
- Black adhesive tape
Software settings :
"Line tracking" for manual editing (create connections directly on the software) or supervised learning (train the robot on the track)
Duration :
20 to 30 minutes
Age :
10+ years
The advantages of this activity :
- Little equipment required
- Quick and easy to make
- Easy-to-understand neural network

This activity is carried out with each robot individually. We're going to teach the robot to follow a line on the ground, without making any mistakes!
Students will learn that the success of supervised learning depends more on the quality and completeness of the robot's training data than on its quantity. They will be able to understand the principle of an artificial neural network very easily, as the one used in this activity is very simple and easy to read (5 inputs, 5 or 6 outputs).
[Video content coming soon]
Introduction
On a flat, light-colored surface, trace a course using black tape (supplied with the arenas).
If you want to use your own equipment, make sure that the robot perceives the contrast between the ground and the line.
The classic shape is an "8", but feel free to use your imagination!
Be sure to create gentle curves to avoid disturbing the robot.
Parameter setting (connection)
Connect the robot to a computer (see section robot connection if necessary), then choose the "line tracking" example configuration for manual editing or supervised learning, or create your own parameters.
Use the cursor at the bottom of your screen to check that the robot's speed is less than or equal to 20.
Training
If you are editing manually :
Check that the "stand-alone" and "learning" buttons are disabled, and that the "manual editing" button is enabled.
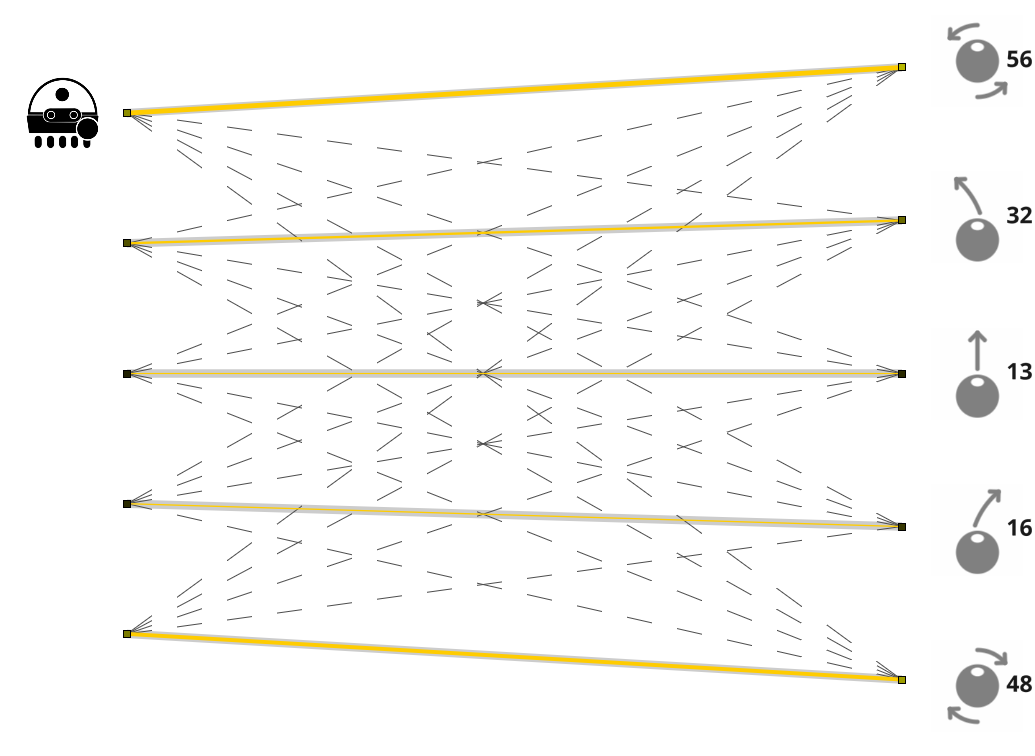
Click on the links between the input (infrared sensors) and output (robot action) neurons to create a connection. We recommend you create the following connections:
- Left IR sensor: rotate left
- Center-left IR sensor: turn slightly left
- Central IR sensor: go straight ahead
- Center-right IR sensor: turn slightly to the right
- Right IR sensor: rotate to the right
This is what your neural network should look like:
If you are a supervised apprentice :
Check that the "stand-alone" button is unchecked, and that the "learning" button is checked.
Place the robot on the line drawn on the floor to activate the sensors. Each time one of the sensors is activated, trigger the corresponding action:
- Left IR sensor: rotate left
- Center-left IR sensor: turn slightly left
- Central IR sensor: go straight ahead
- Center-right IR sensor: turn slightly to the right
- Right IR sensor: rotate to the right
- No sensor activated: back off
We recommend that you give several examples for each situation.
Learning test
Once the neural network is configured, let's see if the robot manages to follow the line!
Place it at the beginning of the course, activate the autonomy and watch how it performs.
You can then make the track more complex by adding intersections to create new challenges for the robots!
Review and feedback
Thanks to a very simple neural network and very little training data, the robot succeeded in following the line.
We can observe on the software the weight given to each connection, and understand how the robot makes its decisions: depending on which sensor is activated (or not), the algorithm assigns preferences to each of the actions to be chosen: the robot selects the action with the strongest preference.
Has your robot gone off track or taken the wrong action? Find out why! Here are a few suggestions:
- there's a bias: you've made a mistake in training the robot
- several sensors are activated at the same time, for example at a crossroads: has the robot been trained to react to this situation?
- the angle of a ground line curve is too steep
- robot speed is too high