Discover our
resources


Materials required:
- 1 robot minimum or software simulation
- 1 computer/robot
- Racing arena
Software configuration :
- example configuration: depends on the code situation
Duration :
1 to 2 hours
Age :
+ 15 years
The advantages of this activity :
- Can be performed with the simulator
Python programming: get to grips with the ultrasound and the camera to program autonomous robot movements, then organize a robot race.
[Video content coming soon]
Introduction
The aim of this tutorial is to program AlphAI so that it moves autonomously, rather than being "remote-controlled" by the student as in the "Remote-controlled AlphAI" tutorial. To do this, we'll need to use its sensors to enable it to react to its environment, in particular to detect obstacles.
We'll look at a quick example using ultrasound, then move on to the camera to organize autonomous robot races on a circuit.
Navigation with ultrasound
Discover the ultrasonic sensor
The get_distance() function (details in the API on the last page) returns the distance measured by the robot's ultrasound (in centimeters). Make sure you activate the sensor with the set_distance(True) function, or it will return the value None instead of distance.
Test this function with the real robot with the following code:
set_distance(True) # activate the ultrasonic sensor
while True:
d = get_distance() # retrieve the ultrasonic value from the robot
print("distance:", d)
By moving the robot by hand, check that the measured distance decreases when the robot is facing an obstacle. You may also notice that, unfortunately, if the robot is in front of a wall, not directly in front of it, but diagonally, this wall is not detected (the measured distance is much greater because the ultrasound reflects off the diagonal wall without returning directly to the robot).
Autonomous movement with ultrasound
Using the get_distance() function, define and test an ultrasound_race() function that moves the robot forward until it detects an obstacle with its ultrasound, and pivots to the right when it detects an obstacle.
Don't try to achieve perfect behavior (that would be difficult). As soon as you have a behavior where the robot knows how to turn if it's facing a wall, and how to go straight if there's no wall, move on to the next step.
Camera navigation
The camera provides much richer information than the ultrasonic distance sensor, and will enable more sophisticated decision-making.
Discovering the camera image
Let's start by displaying the robot's camera image in the software. Open the "Sensors" settings tab on the left, and choose the "64x48 image" camera mode.

the image of what the robot sees appears.
An image is a grid of pixels; in a color image, as in this case, each pixel contains 3 values: the intensities of red, green and blue in that pixel. To see this more clearly, select the low-resolution camera mode "8x6 image".

and in the "Visualization" tab, check "Camera: degraded resolution".

: a very coarse image appears, and the red/green/blue values of each pixel are displayed (values between 0 and 255).

To set the image resolution in the Python code rather than in the software, start by initializing the camera, e.g. set_camera("8x6"). Then retrieve the image with get_camera(). This function returns a 3-dimensional array in the form of a "List" object. The only thing you need to know about this object is how to access the pixel values: if you call this returned object image, you access the pixel value in row i, column j and channel k(k=0 for red, 1 for green, 2 for blue) with image[i][j][k].
Copy and run the following code, and check that the 3 values displayed correspond to the 3 red/green/blue values in the pixel software in the 5th row from the top (index 4 when starting from zero) and the4th column from the left (index 3).
from alphai import *
from time import sleep
set_camera("8x6") # set the camera to the correct resolution
sleep(1) # waits 1s for software to activate camera
while True:
image = get_camera() # retrieves camera image
line = image[4]
pixel = line[3]
print('red', pixel[0], 'green', pixel[1], 'blue', pixel[2])
First autonomous move with the camera
We want the robot to run laps around the circuit autonomously. If you're using an arena supplied with AlphAI robots, the floor is white, the outer enclosure is red, and the central island is black. We'll assume this is the case, and that you want the robot to circulate by turning clockwise.
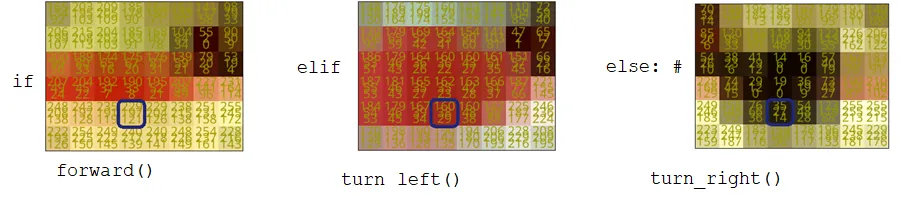
Start by writing a camera_race() function to make decisions repeatedly, as follows (based solely on the color of a single pixel in the lower part of the image):

Si image[4][3][0] < 100 (canal rouge sombre 🡪 le pixel est noir), pivoter à gauche à vitesse 25 pendant 0.5 seconde.

Sinon, si image[4][3][1] < 100 (canal rouge lumineux et canal vert sombre 🡪 le pixel est rouge), pivoter à droite à vitesse 25 pendant 0.5 seconde.

Otherwise (bright red and green channels 🡪 pixel is white), go straight ahead at speed 40 for 0.5 seconds.
Test this program on the track.
As a reminder, the if, else if, else structure is of the following form in Python:
if condition_1:
action_1()
elif condition_2:
action_2()
else:
action_3()
Counting pixels of different colors
You've probably found that making decisions based on a single pixel isn't always the best thing. For example, it may happen that the pixel in the 5th row /4th column is white, so the robot decides to move forward, whereas there's a wall on its side and it should turn instead.
To improve the program, we'll consider all the pixels in the camera image. First, we'll count how many pixels are black, red and white. Then the decision will be made as follows: if the majority of pixels are red, turn right; if the majority of pixels are dark, turn left; and if not, go straight ahead.
To count the number of pixels of a given color, perform a series of for loops for each image component: rows and columns, and then count the color of each pixel using its red, green and blue values. You can use the thresholds you found earlier to determine the pixel's color. You can start with the following code or find your own way - there are many!
def count_pixel_colors(image: list):
# create dict here
number_pxl_black = 0
red_pxl_number = 0
number_pxl_white = 0
for i in range(len(image)):
line = image[i]
for j in range(len(line)):
pixel = line[j]
red_channel = pixel[0]
canal_vert = pixel[1]
canal_bleu = pixel[2]
if ...
number_pxl_black +=1
...
else:
...
return {"noir": nombre_pxl_noir, "rouge": nombre_pxl_rouge, "blanc": nombre_pxl_blanc}
Tip Python syntax for for loops, instead of using indices i and j to access the elements of an array, you can change syntax and simply write :
for ligne in image:
for pixel in ligne:
red = pixel[0]
green = pixel[1]
blue = pixel[2]
...
Autonomous robot race and further improvements
Now you can start organizing races between your robots.
These will be spiced up even further if you continue to improve your program by modifying, for example: movement speeds, color thresholds, additional actions (in addition to the turn by pivoting on the spot, a turn by advancing forward), and so on.
Review and feedback
In programming, the list of accessible program functions is called an API, for Application Programming Interface. It is used by programmers to find out how to interact with the program. You'll find the API for the alphai python module here: https: //drive.google.com/file/d/1C4ovPW_eH5KFz5Y9JvSrzLhtmdOpcp6-/view
TP download (teacher and student)