Discover our
resources

Materials required:
- 1 robot minimum
- 1 computer/robot
- Minimum individual arena (without obstacles)
Software configuration :
- example configuration: "KNN camera".
Duration :
30 minutes
Age :
+ 14 years
The advantages of this activity :
- Intuitive algorithm
- Can be performed with the simulator
- Excellent visualization of robot decision-making
Visualization and application of the K-nearest neighbor algorithm (part of the first year NSI curriculum) to teach the robot to avoid obstacles.
Expert level: in the "Advanced KNN Algorithm" activity, students can reprogram the algorithm themselves and implement it on the robot.
Introduction
Place the robot in an arena without interior walls. Make sure the arena is well lit, so that there is a strong contrast between the floor and the walls.
Setting
Connect the robot to the computer and select the "KNN camera" example configuration.
Ensure that the robot speed is 30 or less.
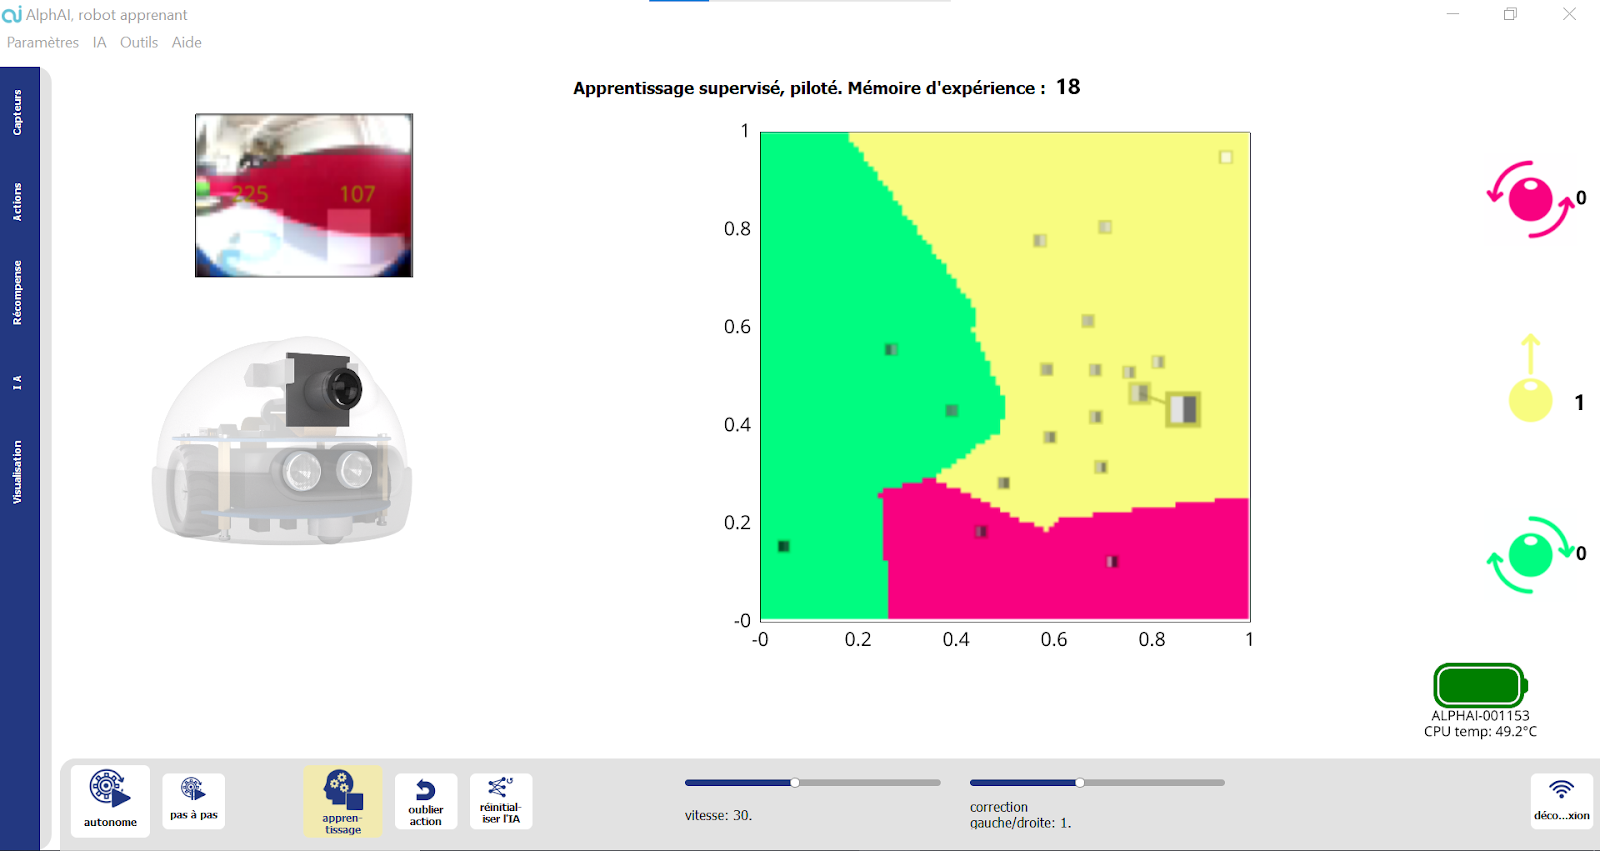
For this activity, the robot analyzes camera images whose resolution has been reduced to just 2 pixels, and without color. The result is a left pixel and a right pixel, which measure gray levels. The abscissa (left pixel) and ordinate (right pixel) of the graph show these grayscale values, with 0 corresponding to black and 1 to white.
.png)
The default actions are forward (yellow), rotate left (pink) and rotate right (green).
It is possible to add more actions for this scenario, but be sure to do so from the outset, as modifying actions causes experience memory to be erased.
Training phase
Check that the "stand-alone" button is unchecked, and that the "learning" button is checked.
Steer the robot by clicking on the arrows on the right of the screen, or by using the arrow keys on your keyboard.
Turn when the robot is close to the walls, go straight otherwise. You can also move the robot by hand to suit each situation.
After each movement, a new point appears. The position of each point is determined by its coordinates (x; y), the abscissa "x" representing the brightness in the left-hand zone and the ordinate "y" representing the brightness in the right-hand zone. The color around each point is the color associated with the chosen action (green to rotate right, yellow to rotate forward and red to rotate left).
.png)
These points are the training data. This phase is essential if the AI is to work properly. If the training data contains too many errors or approximations, the AI will not deliver a satisfactory result.
When you've finished training, open the Visualization panel and check the "Background" box in the "State space" section.
.png)
You will then see the 3 different color zones appear on the screen, corresponding to the action the robot will choose according to the brightness captured by its camera.
If your robot has been properly trained, the graph should look like this:

.png)
Brightness decreases as the robot approaches the walls. Normally, if the area on the left is the darkest, turn right, and vice versa.
When you have three clear regions on the graph, stop the training phase and activate autonomy to move on to the test phase.
Learning tests and improvements
Activate autonomy by clicking on the corresponding button on the screen or by pressing the space bar.
How does the robot behave? Does it avoid obstacles as expected?
If the robot is well trained, it will be able to avoid the edges on its own. If, on the other hand, the robot is poorly trained, or the lighting conditions in the arena are uneven, the colored areas on the graph will have more irregular contours, and the robot will perform more inappropriate actions.
Understand the algorithm's decision-making: the largest point is the one captured by the camera at that moment: it links up with the nearest point in the graph, which was recorded during the training phase: it is the action corresponding to its nearest neighbor that it will choose to perform!
Further information
- In the AI tab, vary the value of k (the number of neighbors). Observe the effect on decision making and graph background coloring. Which value of k gives the best behavior? Why or why not?
- Once you've fully understood the learning principle, repeat the learning process with a smaller number of points (e.g. 5-point training challenge only).
Review and feedback
Points to remember :
- The principle of the k-nearest neighbor algorithm: understand and explain how the robot makes decisions.
- What impact does training data have on results? How do I choose the right training data?
- What is the impact of parameter k? How do you choose the best value for this parameter?
%402x.svg)

